
The Jade Bird Project
A treatment blog post
OBJECT Jade Bird on Wooden Stand
MATERIAL(S) Jade-type semiprecious stone (suspected nephrite or jadeite) and lacquered dark wood.
PROVENANCE Early 20th century, China
DIMENSIONS H 14.5cm; W 26cm; D 6cm
OWNER Mr. Flaxbeard
TREATMENT END DATE May, 24 2024
TREATMENT SUMMARY Surface cleaning, rebonding, in-filling with tinted epoxy.
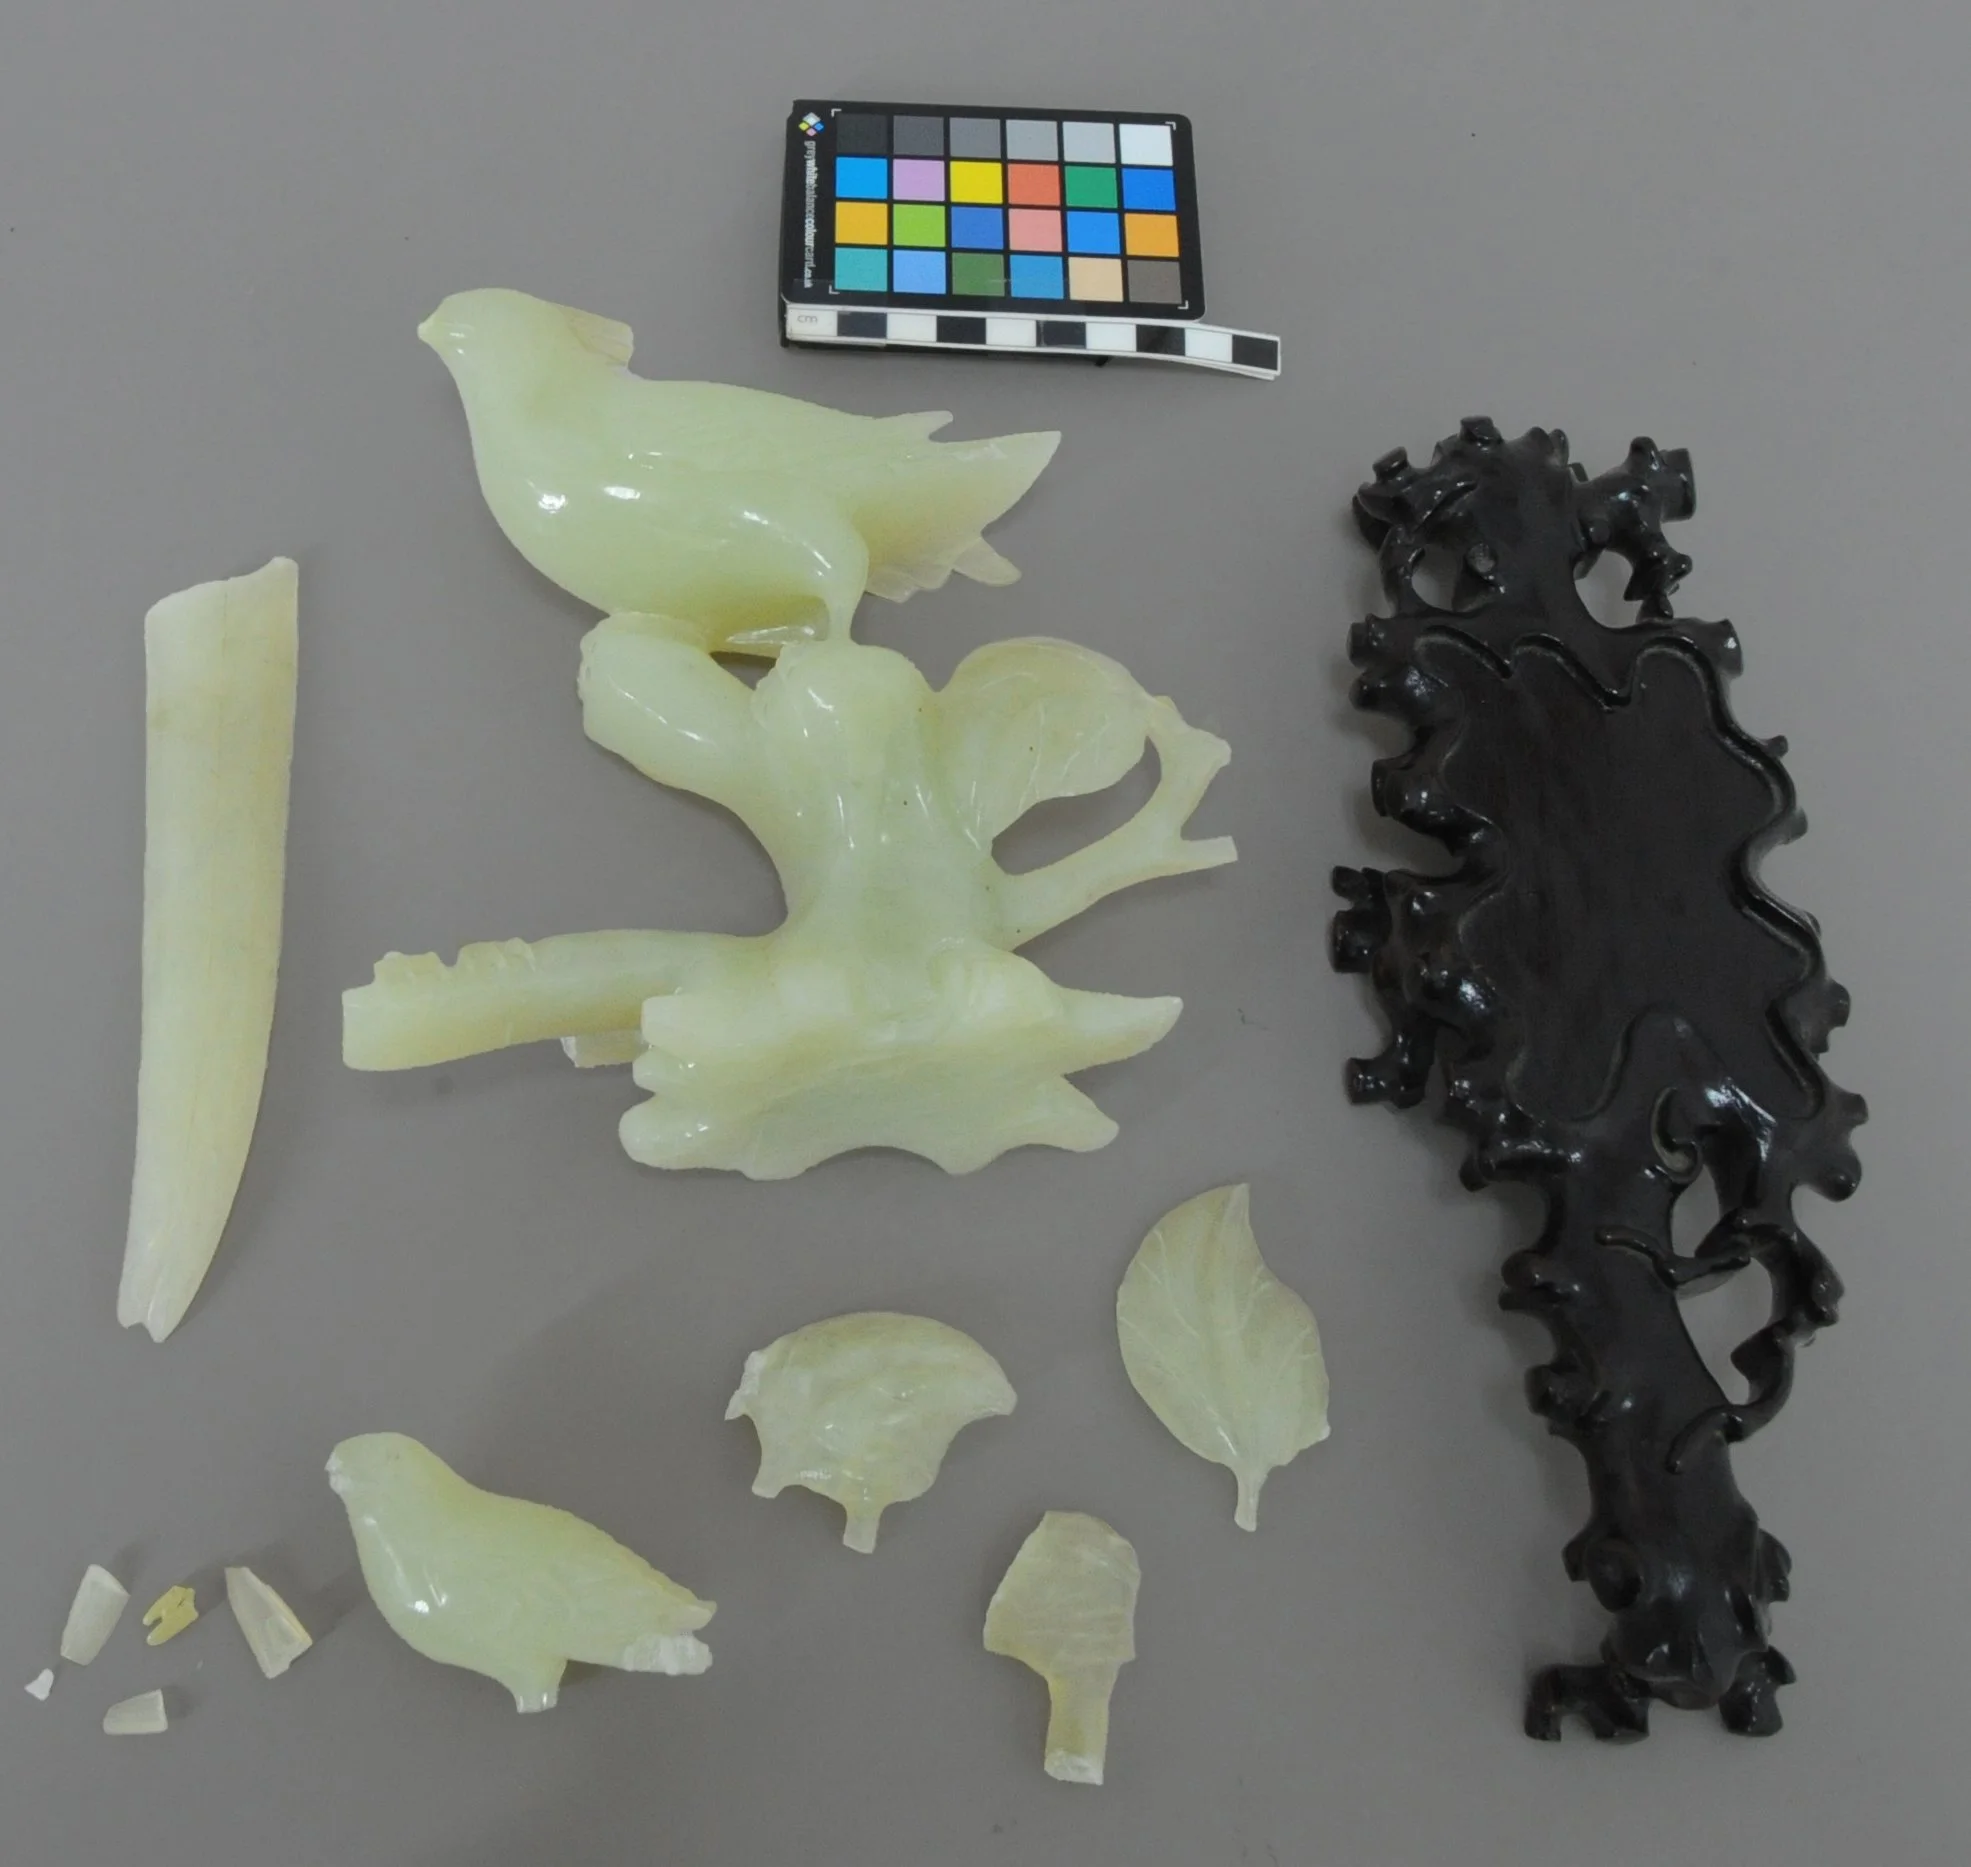
Fig. 1- Object as received
Description-
Chemical
The sculpture is made of a jade material. Jade is a term applied most commonly to jadeite and nephrite, though is sometimes also used to describe serpentine varieties like bowenite. Nephrite, jadeite, and serpentine are hard silicate based materials. The green/yellow-green colour of each stone is due to trace elements, jadeite commonly coloured with Iron, nephrite with magnesium and iron, and serpentine with magnesium and nickel (Arem, Ph.D, FGA, n.d ; Jiang et al., 2020). Upon visual analysis, this sculpture seems to be made from “new jade” variety serpentine, jadeite, or light apple green nephrite (Arem, Ph.D, FGA, n.d.). Although possible to identify the specific mineral an X-ray Fluorescence (XRF) spectroscopy would be required, which was determined to be beyond the scope of the treatment needs of this object.
Visual
The sculpture is depicting two birds, possibly a golden pheasant and a finch, on a leafed branch and is finely carved and well balanced. The object was received with an east Asian style textile covered and lined box with a cushion to fit the sculpture as well as the lacquered wooden stand which the jade bird is meant to be displayed upon. A paper label on the box translates from traditional Chinese to say “Jade Bird Storage”. The stone is vulnerable to scratching, which was deduced from the known methods of fabrication (carving, chiselling, and filing) and varies in translucency and colour throughout. Some small cloudy inclusions, small flecks of dark green, and natural internal texture of the stone can be observed throughout the object. The colour ranges from nearly water white, pale green, creamy white, to faintly yellow-green.
Intro-
This blog post is an in-depth, text-heavy, report of the experimentation and methodologies designed for use in the treatment of an antique jade bird sculpture belonging to a private collection. Each section details the decision making process utalized in the conservation process, and a materials list and relevant recources are cited at the end of the post.

Fig.2- Fly scat and surface dirt on object upon reception
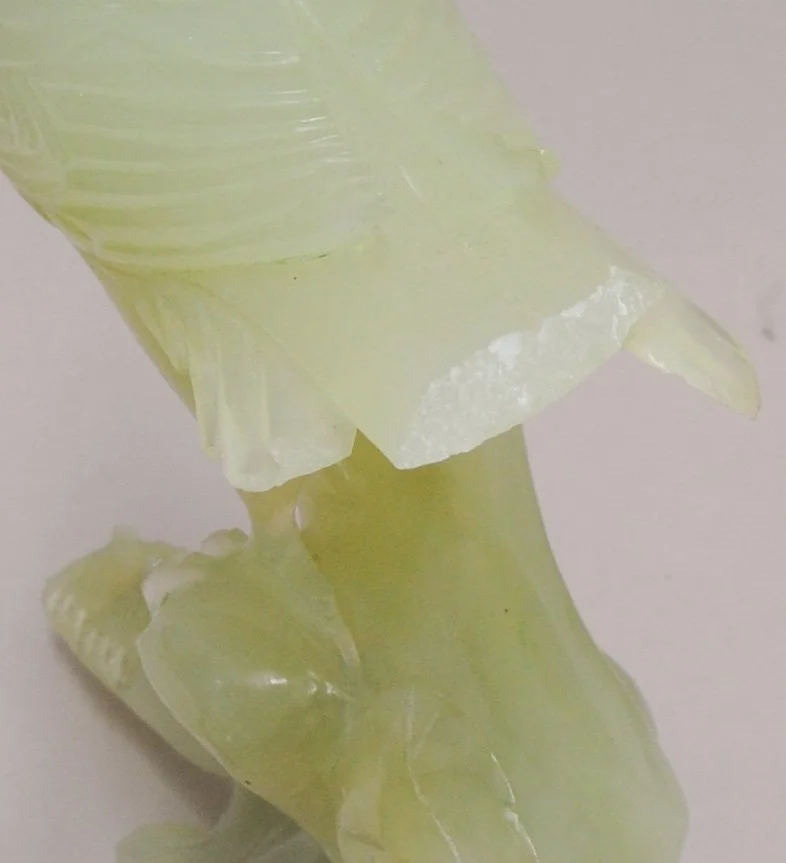
Fig.3- Break edges on feathertips and tail.
Condition-
The stone portion of the object is in poor condition, and is in 10 pieces, not including a fragment made of epoxy as a fill from the previous restoration (fig. 4). There are some small fly scat deposits (fig. 2) and a green surface residue in some crevasses. The stand is in good condition but is fairly dusty.
On the tail fragment, there is a very well aligned previous repair which will be left as is due to the sturdiness and colourfastness of the bond. The exposed break lines look dry and may be slightly friable (fig. 3), which would be due to micro fissures during the breaking.
Tests & analysis-
Cleaning
Cleaning tests determined that using a 50:50 solution of deionised water and IMS was safe to use on the object. The swab tests were carried out on inconspicuous areas, including the underside of the base and the underside of the tail. Two areas were chosen in case there was a waxy coating on the object, as is common with jade sculptures. The wax coating would be unlikely on the underside of the base, allowing access to raw stone, and the underside of the tail would have been coated if one was present, allowing the solvent to be tested on both potential surfaces. There was no obvious coating, although remnants of one did seem to be present in tight crevasses, discovered during the cleaning of the object, indicating the object at one point may have had a wax finish. The 50:50 IMS & deionised water did not appear to impact the residues.
Creating Epoxy-based Jade Fills
In order to match the translucency and hue of the various areas of loss, multiple colour variations of epoxy were made. Both Epotech and Hxtal two-part epoxies were uses, and initially fumed silica was used to opacify the epoxies. The samples were slightly too opaque, and the fumed silica trapped micro bubbles in the resin, which was not ideal. Powdered pigments also created an issue with microbubbles, as well as not dissolving well into the epoxies. So, instead of fumed silica, a miniscule amount of titanium white golden brand high-flow acrylic was used with other high-flow acrylic colours to reduce particulate levels within the epoxy and avoid microbubbles.
Finding a Solution for When Tape Won’t Stick
The waxy surface texture and complex shape of the sections meant the usual methods of temporarily securing breaks together while the adhesives cured were not cutting it. Taking from a previous experiment in using low-melt hot glue to tack together porcelain and glass in a similar way sticky wax is used, I decided to test hot glue for use on jade.
After preliminary testing was done on a contemporary test object of similar material resulted in no observable changes I chose an inconspicuous location on the sculpture to text the low melt hot glue (a paraffin wax mixture which melts between 200°F and 300°F (93°C and 150°C)).Tests were successful and low melt hot glue was determined safe to use on the object to support the fragments as the adhesive set. The hot glue was easily removed by gently picking/peeling off with an edge of a metal spatula. If the hot glue spot resisted a gentle pick, a cotton bud dampened with IMS was touched to the side of the dot, where it touched the object, and after a few seconds was able to be easily removed with a fingernail.
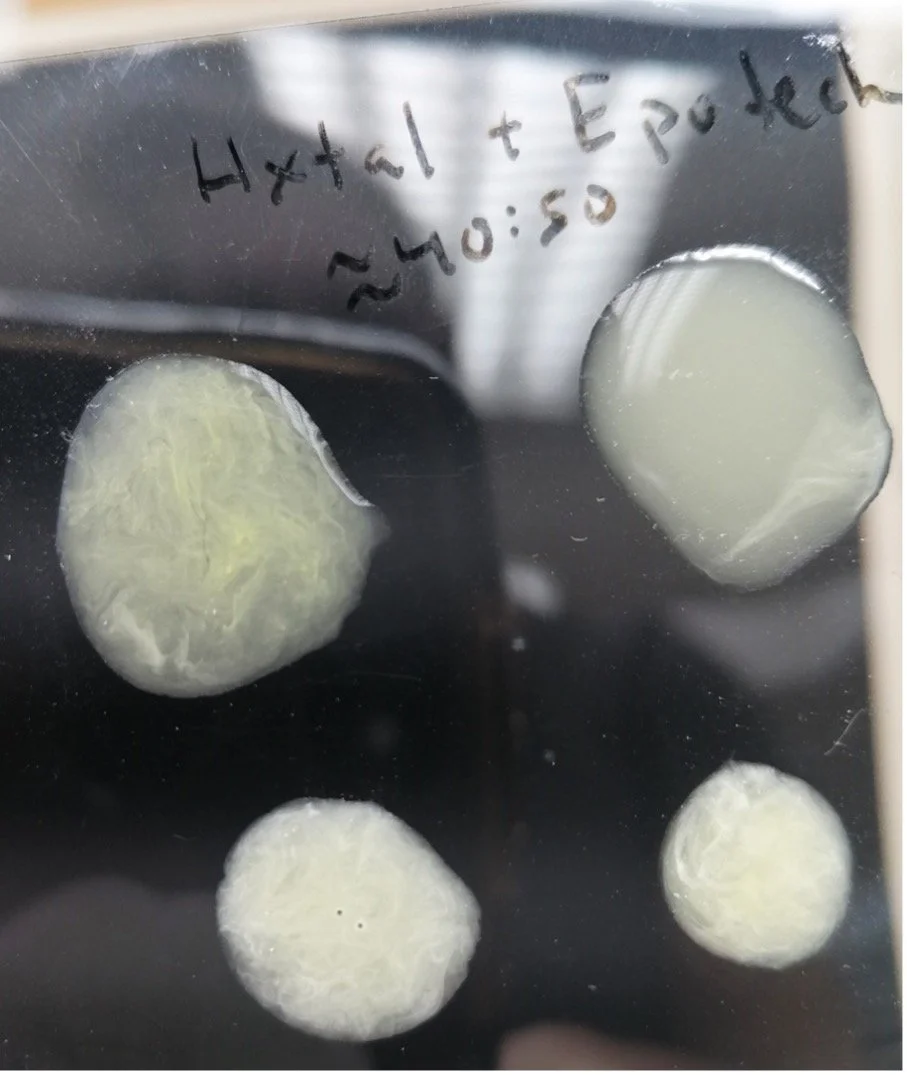
Fig.4- Pictured here is an experiment with leftover resin to mimic the striation naturally occurring in jade, this technique ended up not being employed as the missing sections do not appear to have had notable striations.
Treatment Agreed and Carried out-
Cleaning
Due to the unknown exact nature of the stone, careful consideration of tools was necessary to prevent scratching. Some varieties of serpentine can be scratched even by common house dust (Arem, Ph.D, FGA, n.d.). A soft brush was used to remove surface dust, and cotton swabs wetted with 50:50 solution of deionised water and IMS (Industrial Methylated Spirit). A soft brush was used to clean the break edges. All breaks were new, besides where the beak fill had been attached, so the break edges had some dust from microfractures occurring during impact. A light touch with the brush was necessary, as removing only the detached jade dust and not any which could be consolidated by the adhesive was the goal.
A microfibre cloth, soft mop brush, and a fine detail paint brush were used to clean the wooden stand.
Bonding
After considering the porous nature of the jade stone, research was done to identify potential adhesives which would be most appropriate. This included reading articles on the treatment of similar objects, carrying out basic tests on semi-porous stone samples, and consulting an expert who has extensive experience working with semi-porous stone. The acrylic resin Paraloid B-72 (Ethyl methacrylate co-polymer) strengthened by the addition of fumed silica, and gelled Hxtal (Epoxy resin) were chosen. Paraloid B-72 was used on all low-weight baring bonds, and Hxtal on the bond between the tail and main body fragments. This was done because although gelled Hxtal would be less likely to migrate into the microscopic veins of the stone than when it is freshly mixed with a low viscosity, epoxy is far stronger of a material than jade. This was demonstrated by the most recent breaks occurring on the original fabric of the object, and not where the object had been previously broken and bonded. The exception of this was where the beak had been adhered, though it might have been a removable fill bonded with something akin to Paraloid B-72, thus demonstrating the weaker bond of those types of adhesive. An ideal adhesive is strong enough to support the weight of the object but would break before the original material in the case of another damage event. Paraloid B-72 fits this requirement but might have been too weak of a bond at the tail break, which is why Hxtal was used for this bond. Hxtal had to be partially set, so that it was more viscous lest run the risk of flowing into the natural micro-vein structure of the stone and away from the bond area, which would have resulted in a weak join and an irreversible impregnation of the stone by resin. This could have resulted in darkening of the stone material around the bonded area, which would have been undesirable.
Due to the waxy nature of the stone surface, low-melt hot glue (a paraffin wax mixture), was used to secure fragments together while the resin was curing. For the longer to set Hxtal, gravity was also utilised to support the alignment of the join. Cork rings, acid free paper, and a support cushion were used to prop the object in the right position so that the tail section was balanced on top of the bond line to allow the weight of the fragment to keep itself in tight alignment. Bonding had to be done in multiple stages so that gravity did not work against the alignment in one area while working with another bond in another area.
For documentation purposes, I created a bondline map for the treatment report generated for the client to keep with the object. The map included fig. 5, as well as a description of which adhesives were used in each bond.
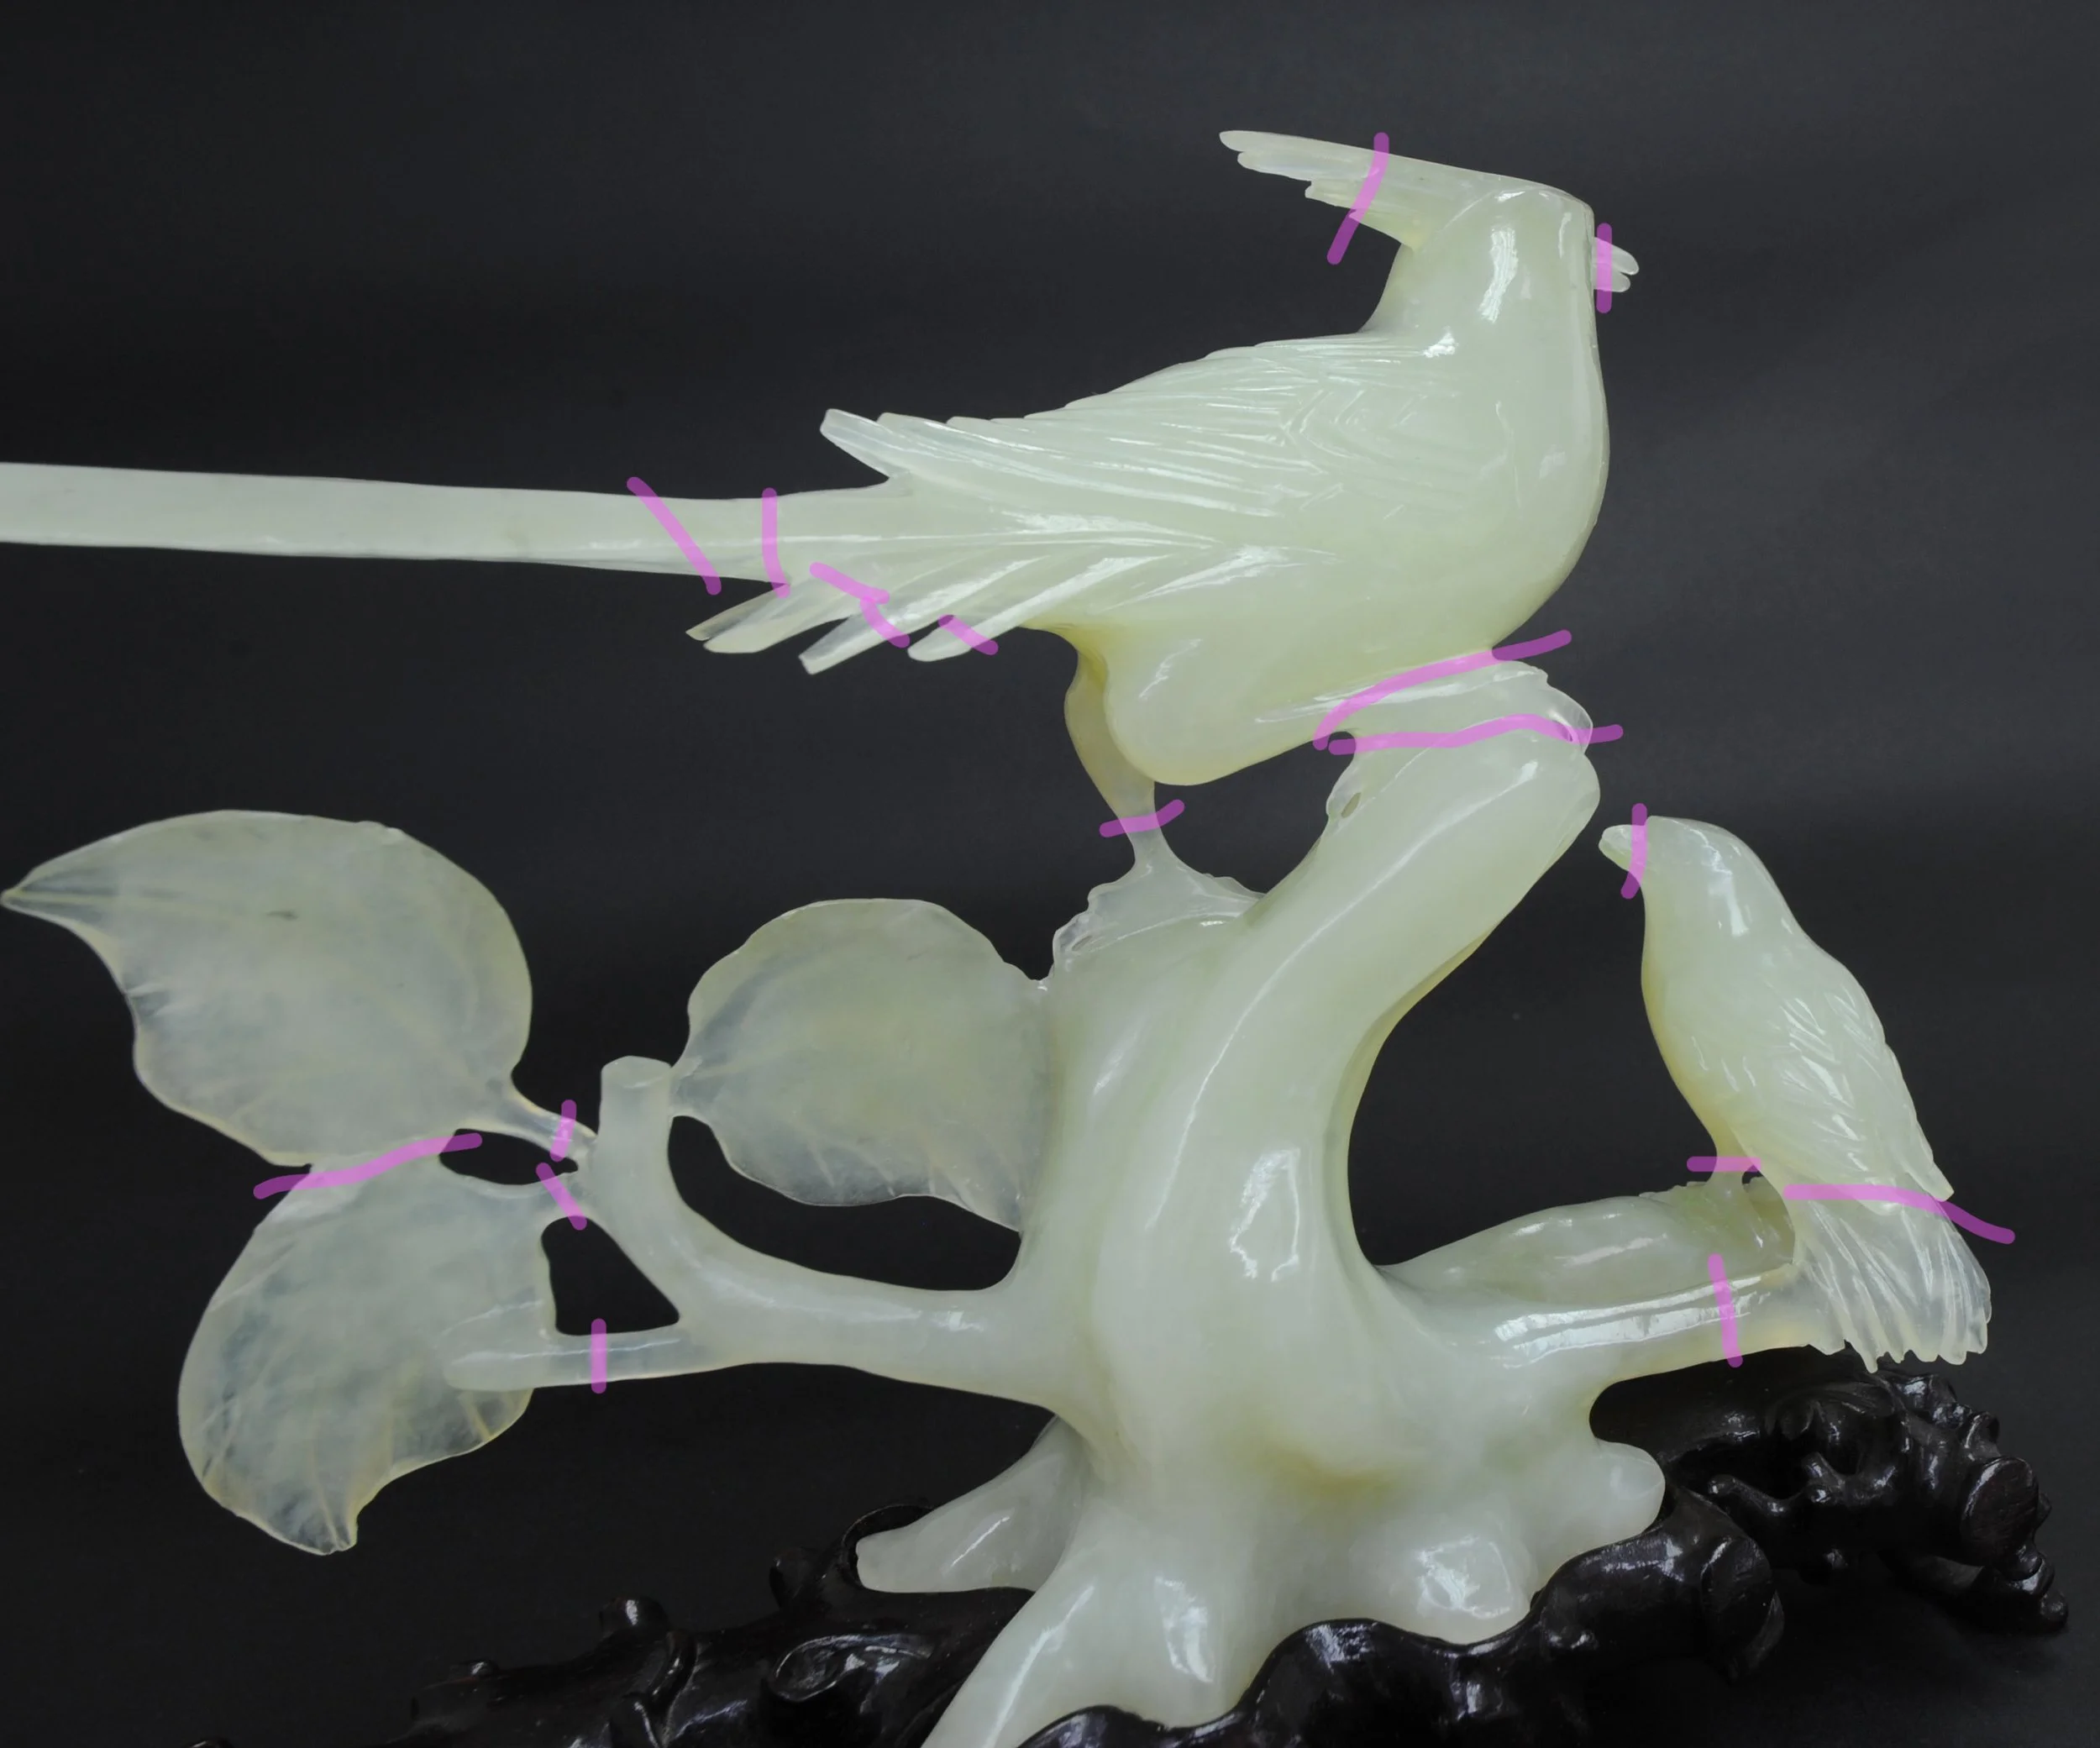
Fig.5- Highlighted in this image are all the bondlines, including those from a previous treatment.
Filling
The fills were made by sculpting mock-ups in carving wax or Milliput superfine (two-part epoxy putty), and then cast away from the object using Epotek 301-2 (two-part epoxy resin), coloured with high flow golden acrylic. Once the fills were nearly set, approximately 75% hardened, they were demoulded and carved with a small scalpel to refine the shape.
The fills were then bonded to the object using 55.5% Paraloid B-72 in acetone with fumed silica. Once the fills were allowed 24 hours to bond to the object, I further refined the shape of the beak with a scalpel. The fills were finished off with a and with a layer of 20% Paraloid B-72 in acetone to add a sympathetic medium gloss/waxy finish.
Initially I was going to use the beak fill made during the previous treatment (fig. 7), however not only had it yellowed but further investigation determined that the original beak was likely in two parts rather than one like the fill. Additionally, there is evidence that there was a finely carved tongue between the two beak halves, so I decided to recreate the beak with this new information in mind (finished fill in fig. 5).
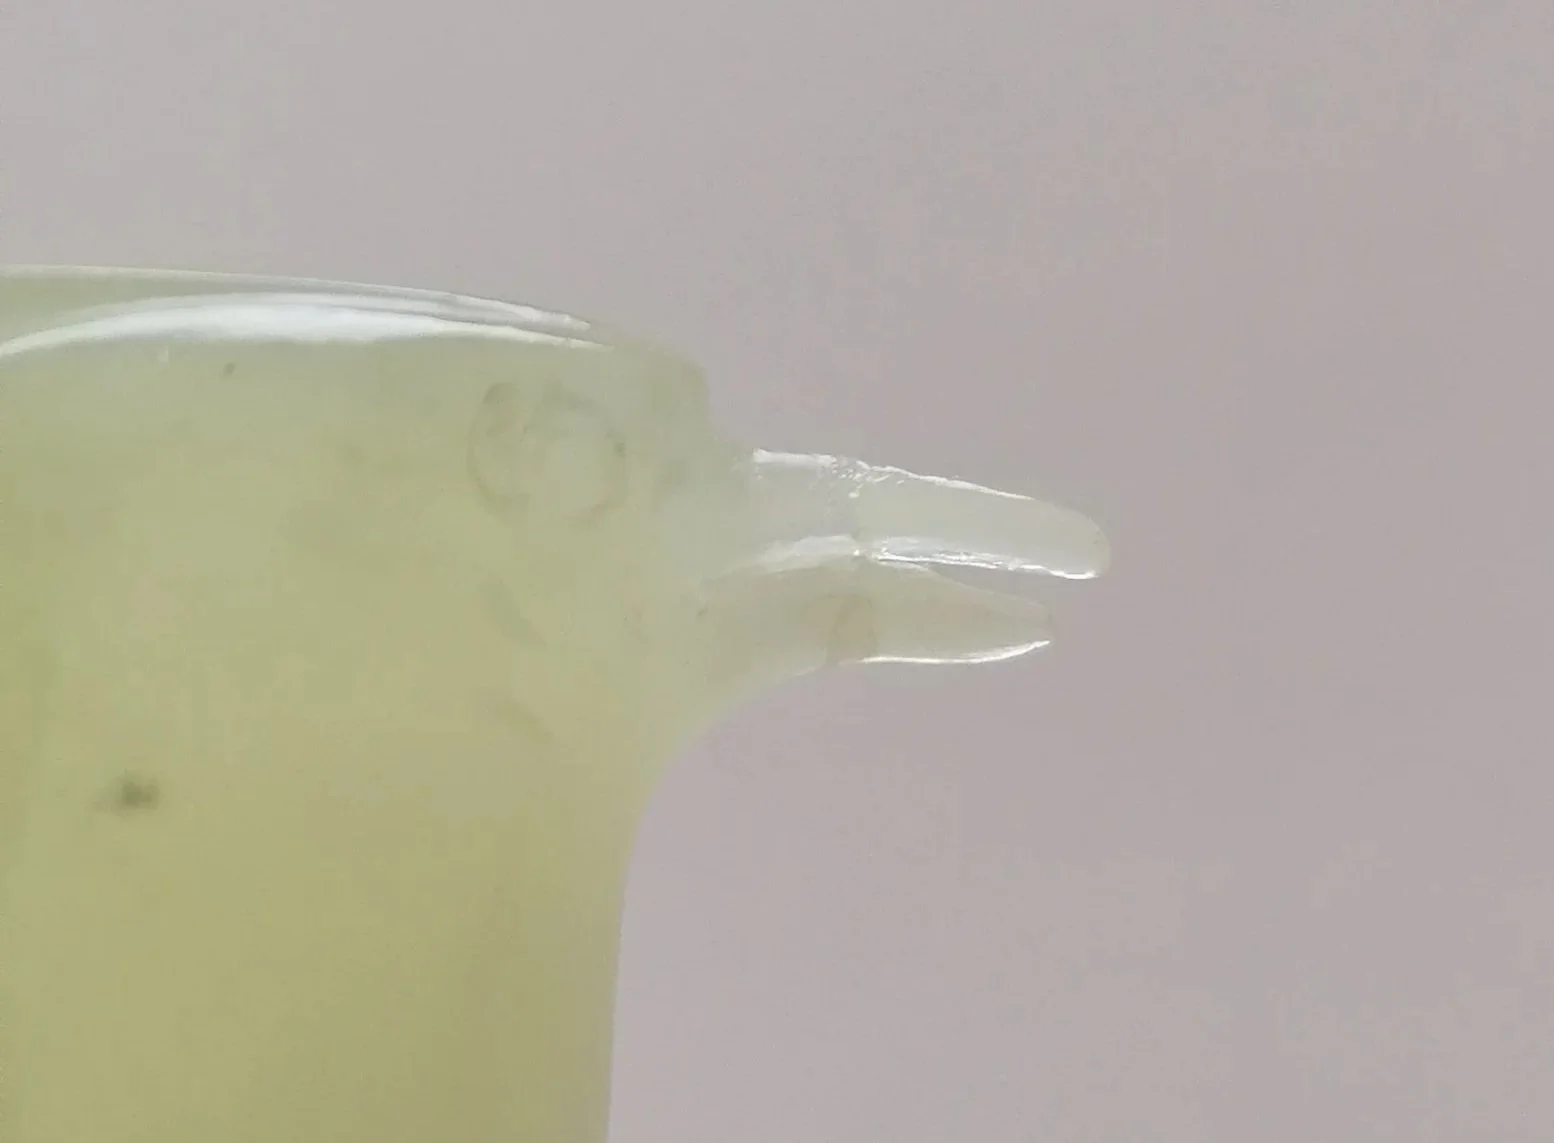
Fig.6- Pictured here is the finished beak fills– a two piece fill with a finely carved tongue, which differes from the single piece fill seen in fig. 4.
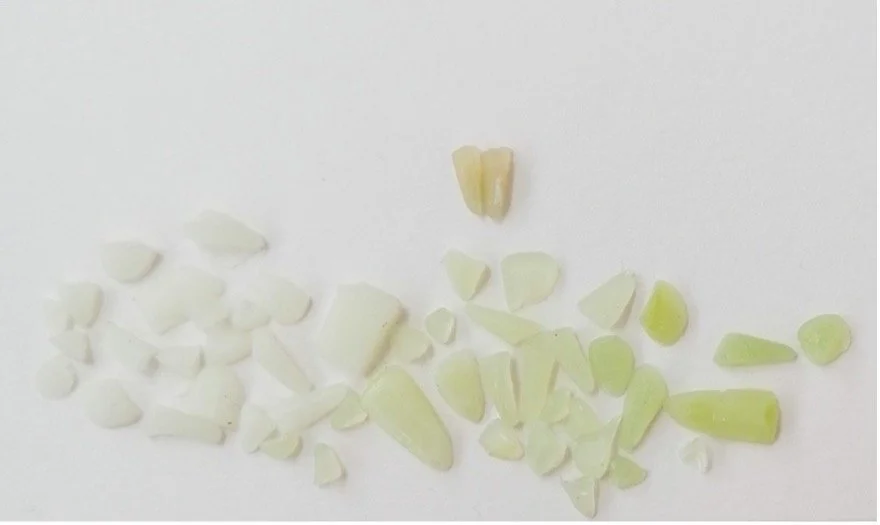
Fig.7- Pictured here are all the fill color variations I experiemented with, though they appear opaque as they have not yet been polished. I used semi-cured templates and cut them to the precise shape and size, necessitating a final gloss layer to expose the transparency beneath the rough surface. The top yellow fill is one made about 20 years past, when the object had been previously repaired using Fynebond epoxy. I chose to replace it with a new one due to the mismatch in color.
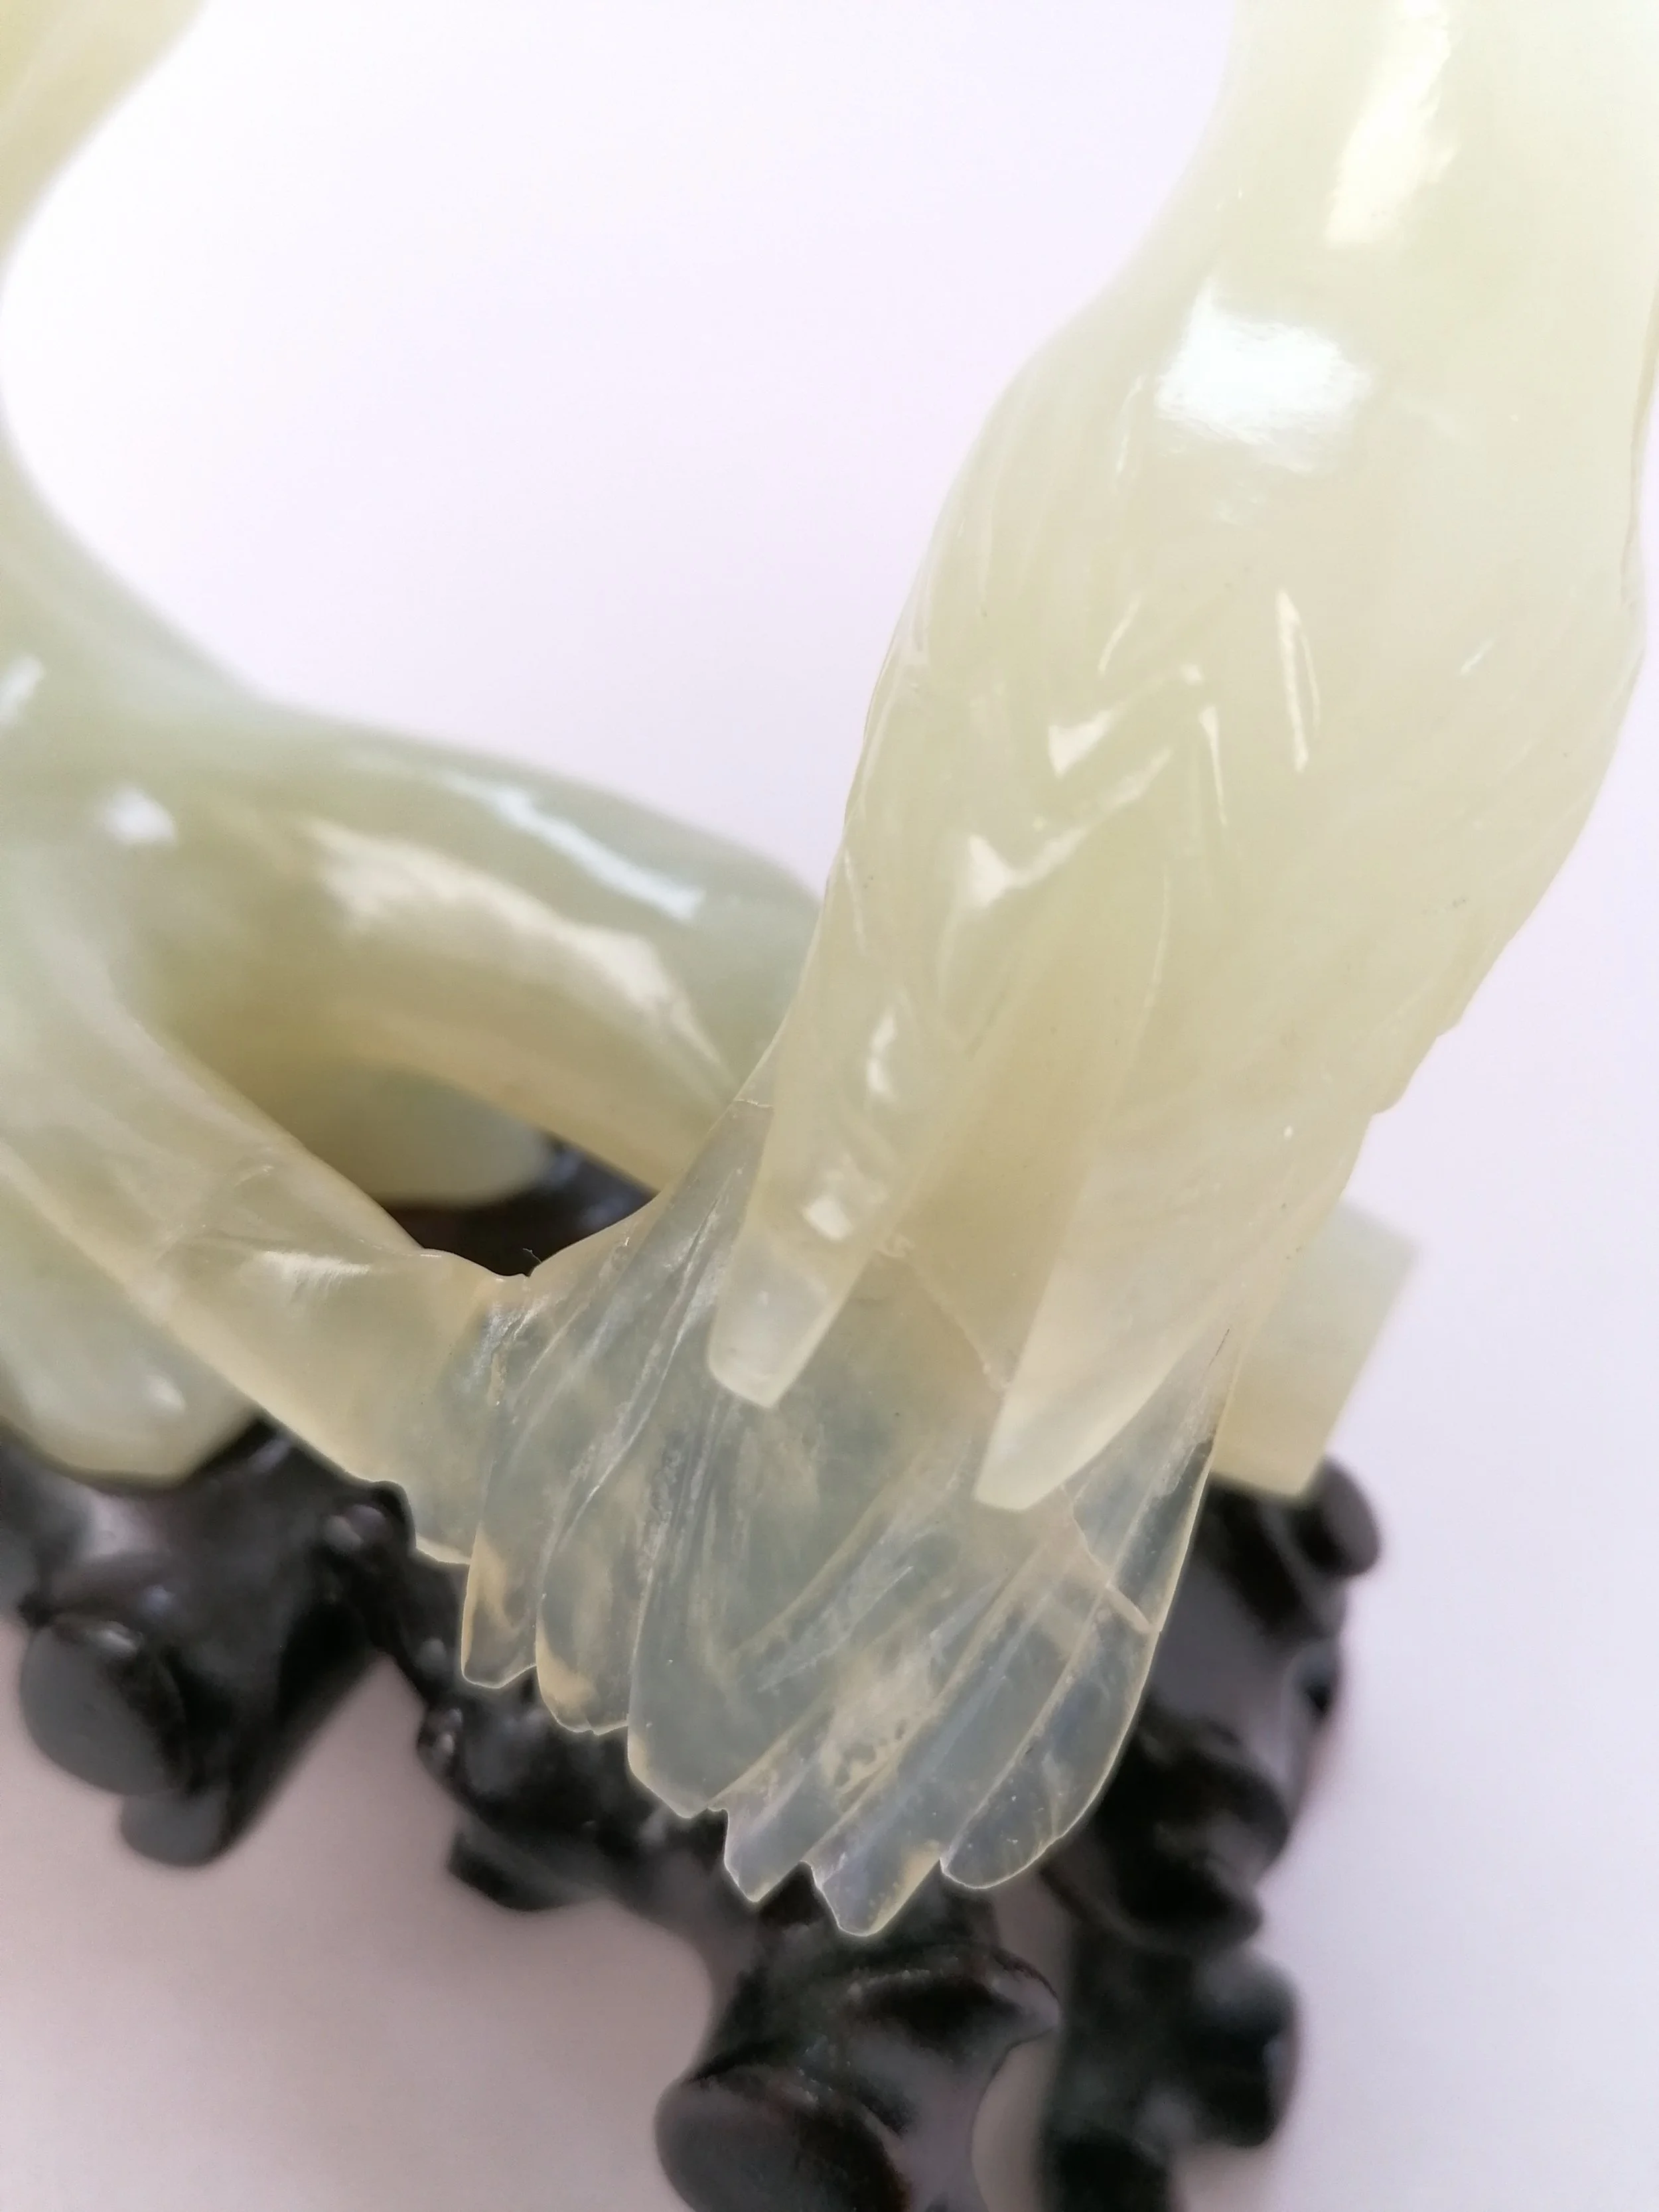
Fig.8- Object after treatment, close-up on the small bird tail bondline.
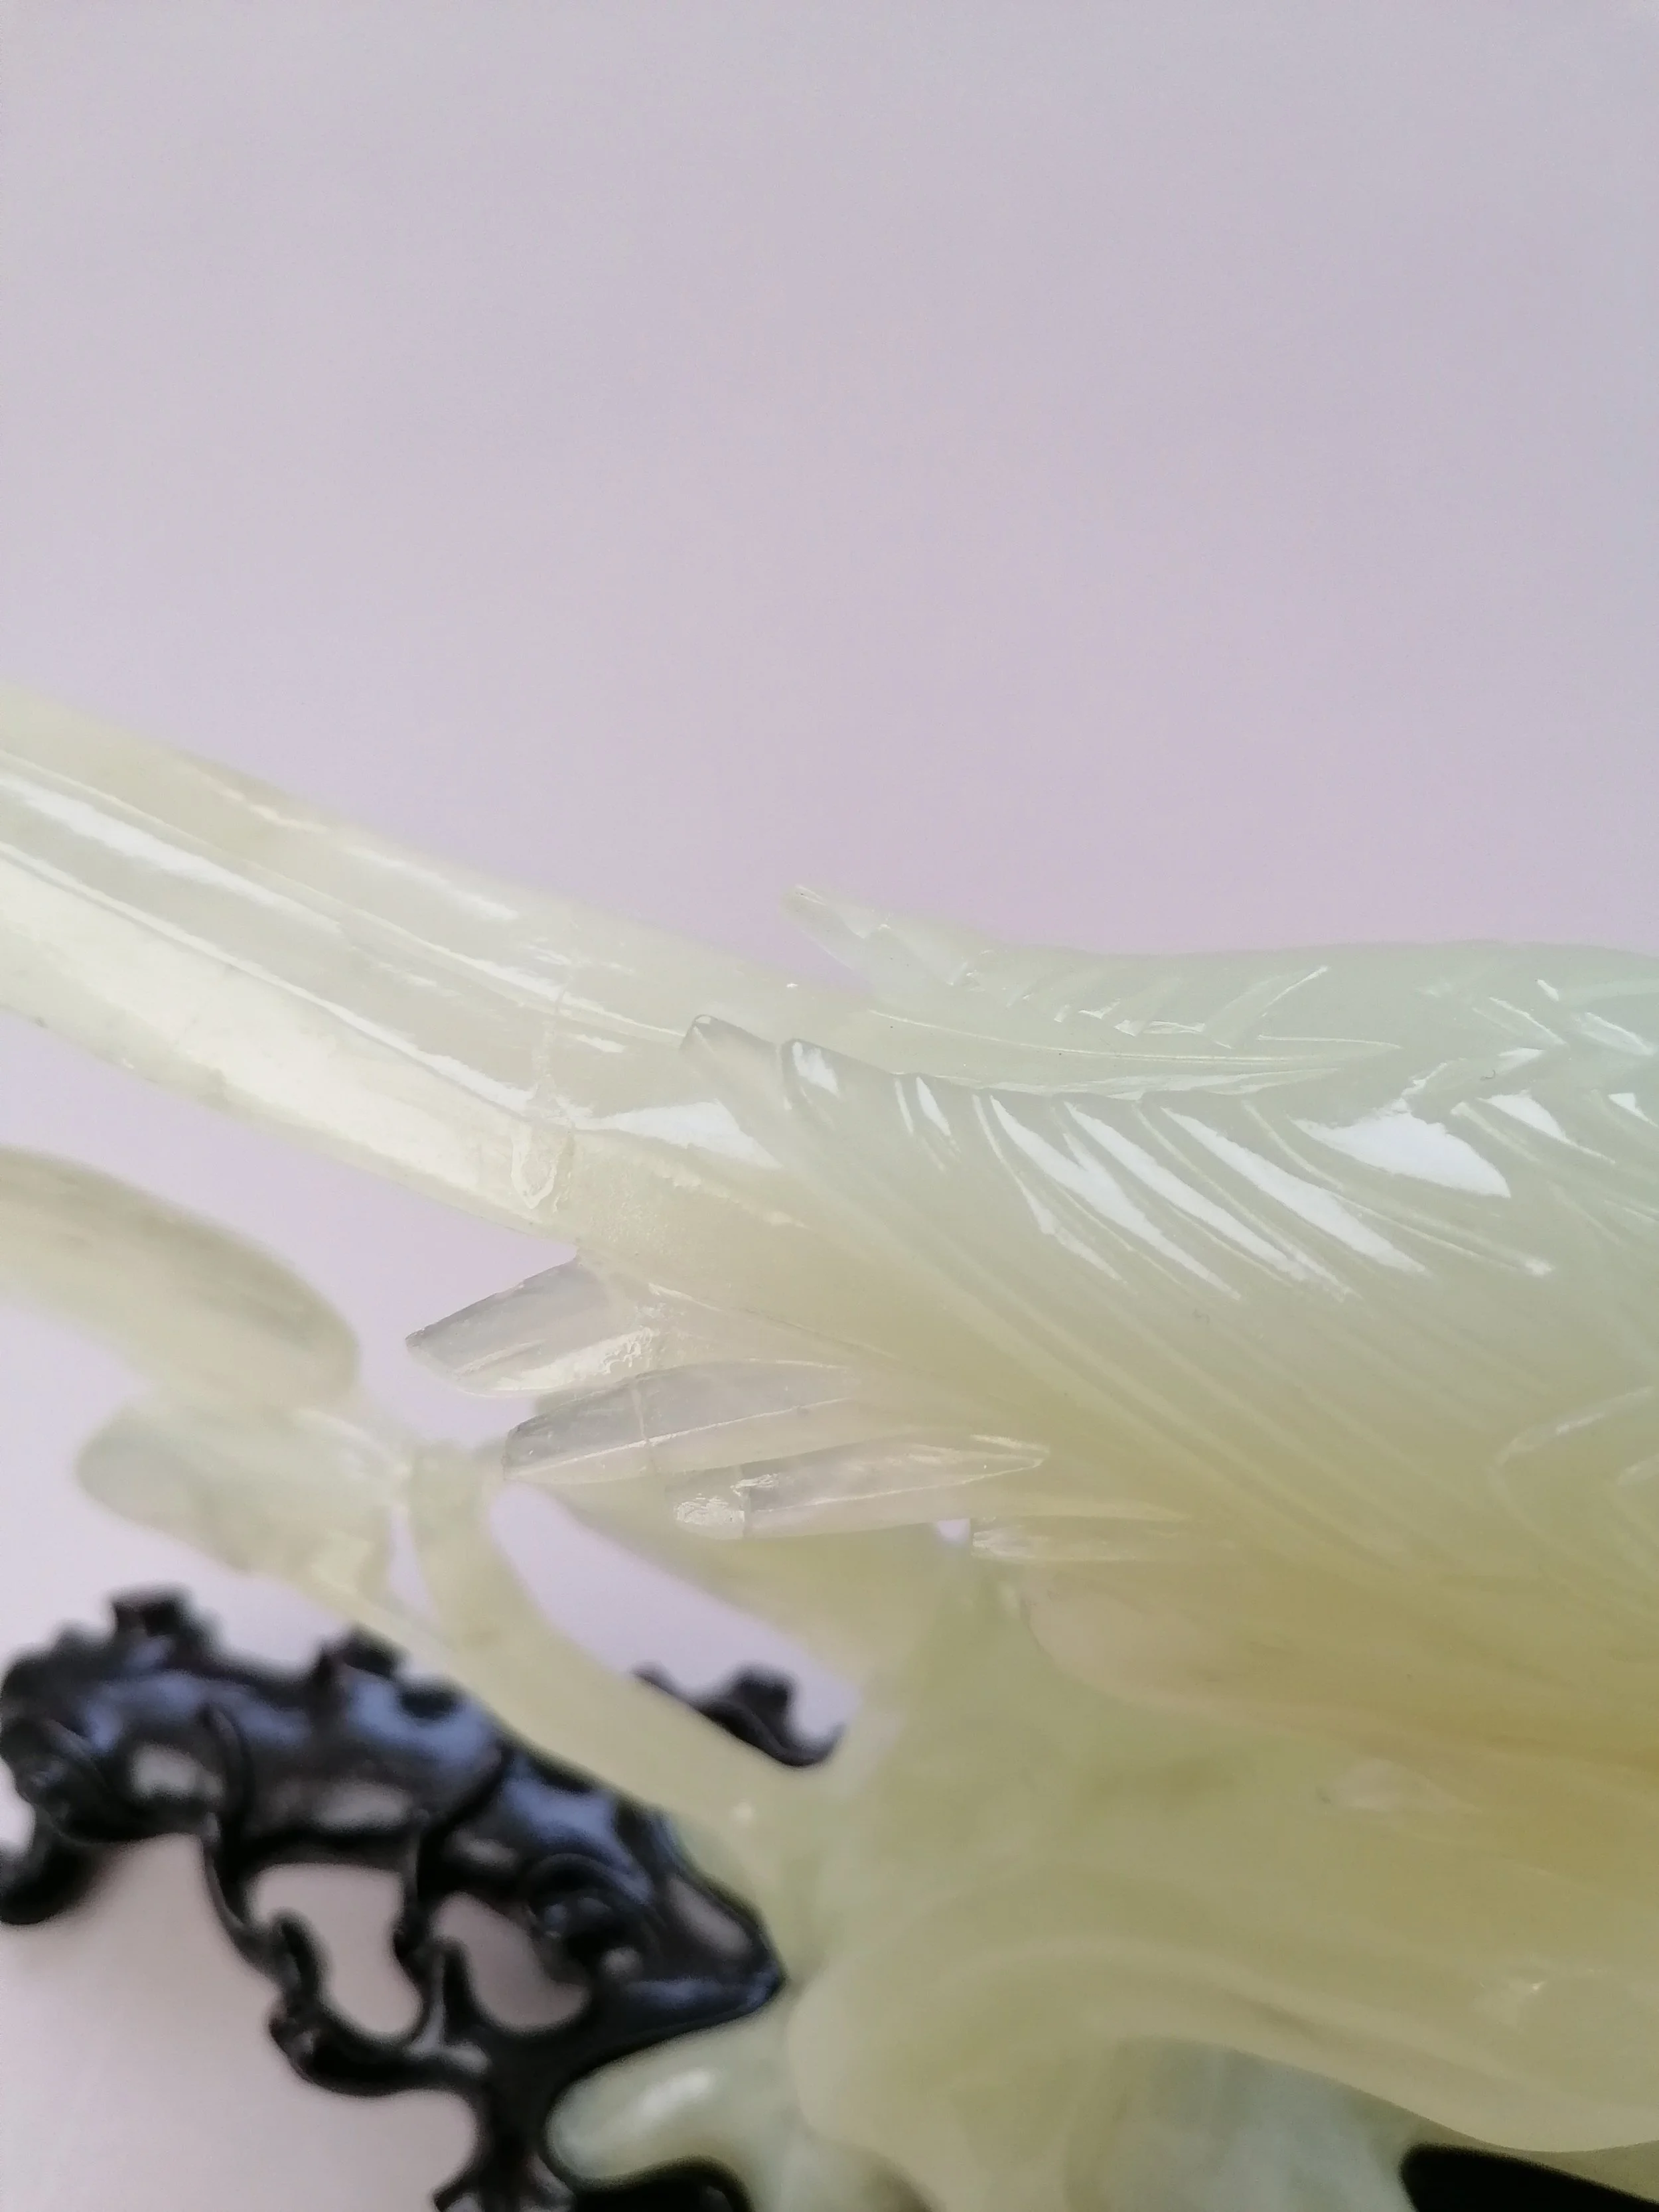

Fig.9- Object after treatment, close-up on the bondlines along the tail and wing feathers. A small epoxy fill can be seen in the foreground along the tail bondline.
Fig.10- Object after treatment with white background.

Fig.11- Object after treatment with white background.

Fig.12- Object after treatment, with scale card on dark background.
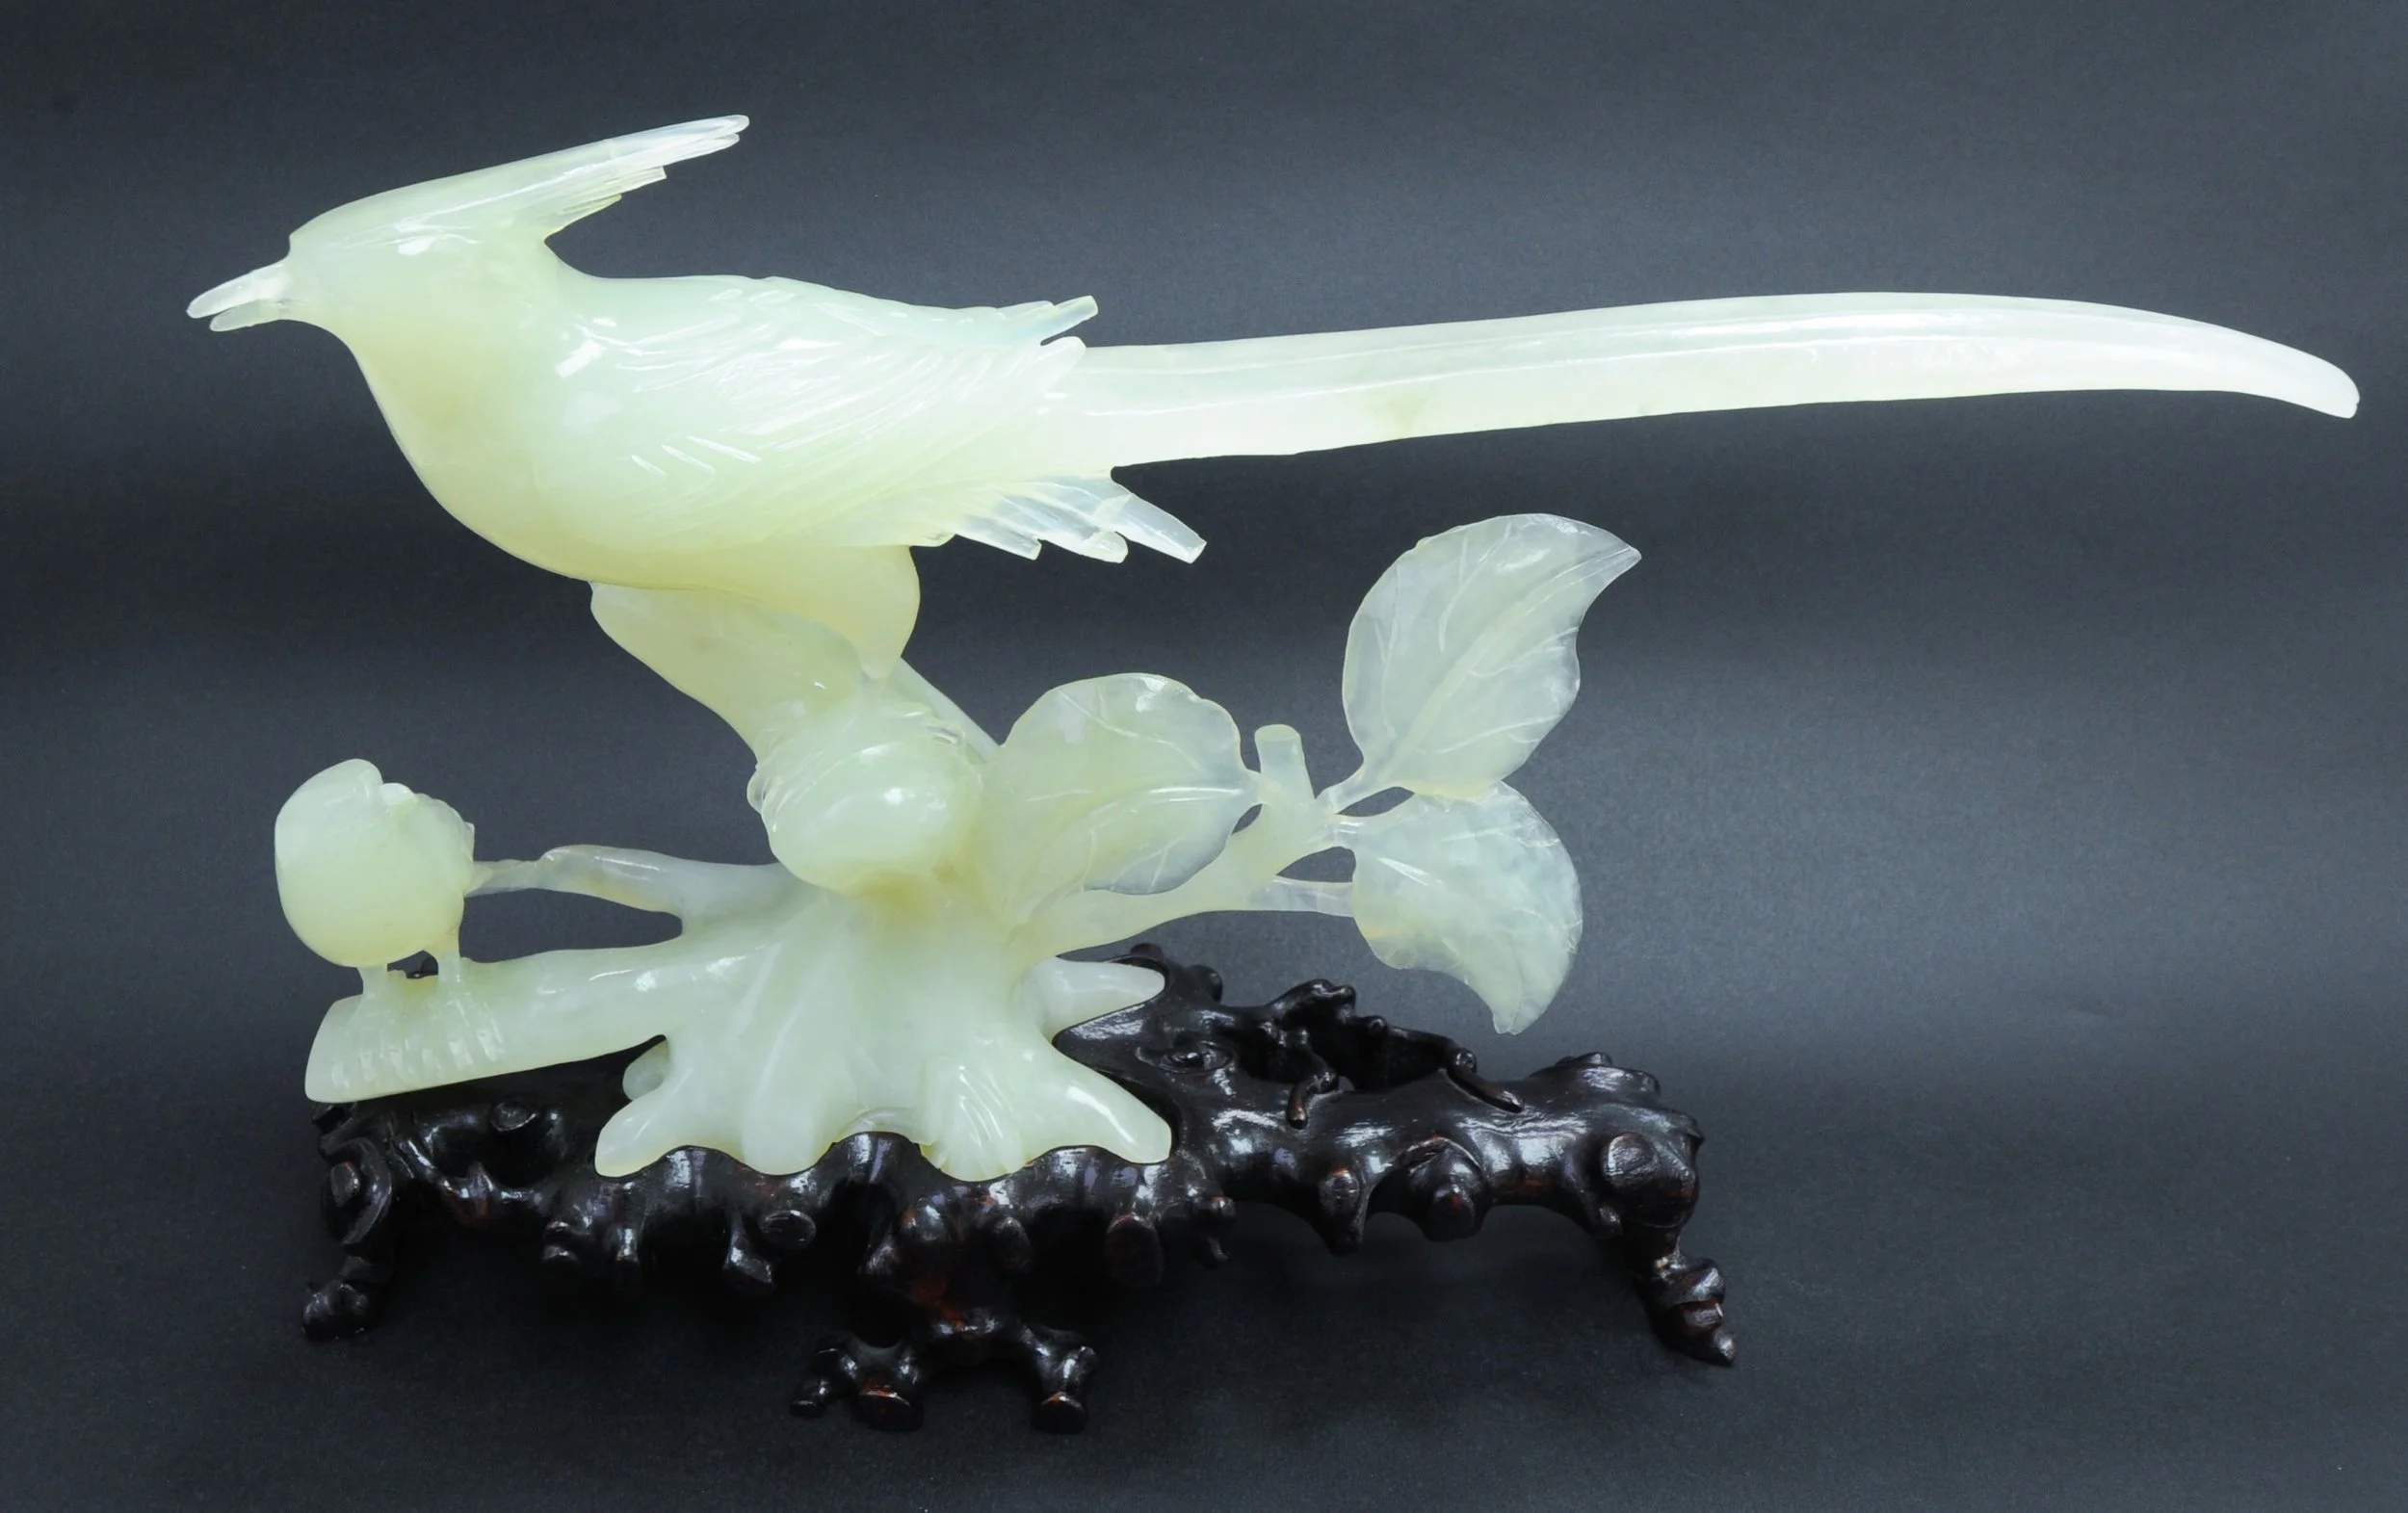
Fig.13- Object after treatment, with scale card on dark background.